Table of Contents
MedusaJS Marketplace Guide: How to Build a $1M Marketplace in an Hour
Ajibade Adebayo
Software Engineer @ Rye
6 Minutes Read
It doesn’t need to take weeks to start a new marketplace in your niche anymore. E-commerce veterans know that the hardest part of starting an online marketplace is finding and onboarding reliable merchants with high quality products. Right behind that is building a platform that sells and scales. This guide will walk you through building a MedusaJS open-source marketplace, filling it with Amazon Business products, and earning a margin for each sale. No brand partnerships or inventory needed, thanks to Rye’s Sell Anything API.
An API to Start Selling Any Product
We built the marketplace on Medusa JS, an open-source Shopify. It enables composable, headless, and hyper-customizable eCommerce through community architecture. MedusaJS consists of 3 parts: the backend, the admin panel, and the storefront.
Medusa is a toolkit for developers to create digital commerce applications. In its simplest form, Medusa is a Node.js backend with the core API, plugins, and modules installed through npm. See their docs here and compare it against Shopify here.
We then plugged in Rye’s Sell Anything API to populate our marketplace with products to sell, as well as set up payment gateway. This API enables developers to fetch product data from any Amazon Business or Shopify store, with the mechanisms to automatically send orders back to the merchant to fulfill.
Rye is a set of APIs that enable developers to sync product data, automate ordering, support payments, and manage orders post-sale (incl. tracking updates, order cancellations etc.). With Amazon Business, Rye developers are able to list and programmatically order products from the marketplace. View docs here.
Piecing the Two Together Into a Marketplace
We pieced these 2 together to build a marketplace. Follow these 4 steps to start selling and earning in one day:
The backend
Set up Medusa locally
Add products to the store using Rye’s API
The frontend
Integrate payments using Rye Pay
Place a real order
Note: This tutorial assumes basic knowledge of Git, Node, Bash, and Typescript. We also assume this is run on a Mac or Unix system
Set Up Your Environment
First we need to make sure we have all the prerequisites:
Create an account at the Rye console
Install Postgresql (used for your local database)
Once installed, open
pgAdmin 4. It comes with the MacOS install. Open the app by searching withCommand + Space. Take note of your password, we will need it later.Create your database. Select
DatabasesunderServersin the left panel. Then in the top menu select Object→Create→Database…A modal should popup. Name the database
rye-storeand click save.
Ensure you have Node installed by running
node --version. If you don’t have node:Install node.js with nvm (node requirement ≥18.17.0)
Git
1. Set up Medusa locally
We will first run through steps to set up Medusa.
For the tutorial we will clone two repos that contain default settings. Run the following commands from your terminal to download the code.
git clone https://github.com/rye-com/rye-medusa.gitRye Medusa Storefront (NextJS App)
NextJS is a popular frontend framework that Medusa uses to build the frontend.
git clone https://github.com/rye-com/rye-medusa-storefront.gitAfter cloning the repos, we will create environment variable files at the root of both repos.
Environment files
rye-medusa
Create a file called
rye-medusa/.env
DATABASE_TYPE=postgres
# POSTGRES_PASSWORD is the password you set when installing postgresql
DATABASE_URL=postgres://postgres:${POSTGRES_PASSWORD}@localhost/rye-store
MEDUSA_ADMIN_ONBOARDING_TYPE=nextjs
STORE_CORS=http://localhost:8000,http://localhost:7001
MEDUSA_ADMIN_ONBOARDING_NEXTJS_DIRECTORY=rye-medusa-storefront
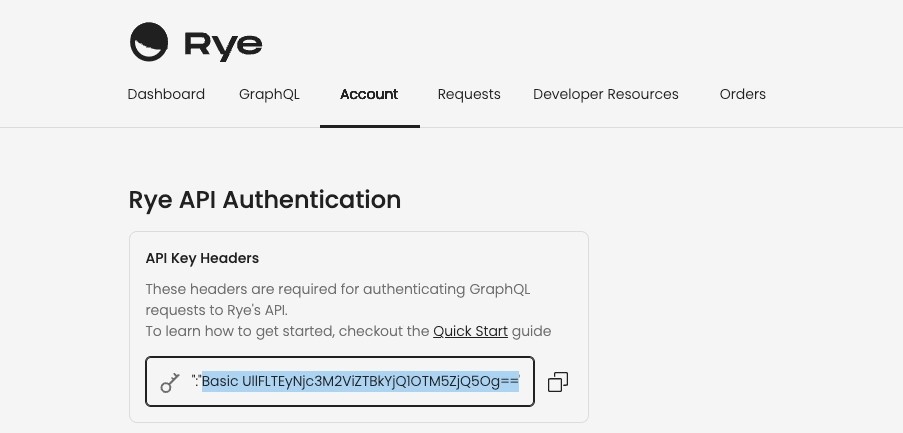
# Extract this value from console.rye.com/account > Rye API Authentication > API Key Headers
RYE_AUTH_HEADER="Basic ${AUTH_TOKEN}"Replace
POSTGRES_PASSWORDwith the password from the Postgres installationReplace
AUTH_TOKENwith the value from console.rye.com/account > Rye API Authentication > API Key Headers
rye-medusa-storefront
Create the environment file
rye-medusa-storefront/.env.local
# Your Medusa backend, should be updated to where you are hosting your server. Remember to update CORS settings for your server. See – https://docs.medusajs.com/usage/configurations#storefront-cors
NEXT_PUBLIC_MEDUSA_BACKEND_URL=http://localhost:9000
NEXT_RYE_API_HEADER=http://localhost:9000
NEXT_RYE_AUTH_HEADER="${AUTH_HEADER}"
NEXT_PUBLIC_RYE_AUTH_TOKEN="${AUTH_TOKEN}"

# Your store URL, should be updated to where you are hosting your storefront.
NEXT_PUBLIC_BASE_URL=http://localhost:8000

# Posgres URL for your Medusa DB for the Product Module. See - https://docs.medusajs.com/modules/products/serverless-module
POSTGRES_URL=postgres://postgres:postgres@localhost:5432/medusa

# Your Stripe public key. See – https://docs.medusajs.com/add-plugins/stripe
NEXT_PUBLIC_STRIPE_KEY=

# Your PayPal Client ID. See – https://docs.medusajs.com/add-plugins/paypal
NEXT_PUBLIC_PAYPAL_CLIENT_ID=

# Your MeiliSearch / Algolia keys. See – https://docs.medusajs.com/add-plugins/meilisearch or https://docs.medusajs.com/add-plugins/algolia
NEXT_PUBLIC_SEARCH_APP_ID=
NEXT_PUBLIC_SEARCH_ENDPOINT=http://127.0.0.1:7700
NEXT_PUBLIC_SEARCH_API_KEY=
NEXT_PUBLIC_INDEX_NAME=products

# Your Next.js revalidation secret. See – https://nextjs.org/docs/app/building-your-application/data-fetching/fetching-caching-and-revalidating#on-demand-revalidation
REVALIDATE_SECRET=supersecret
Once again, replace
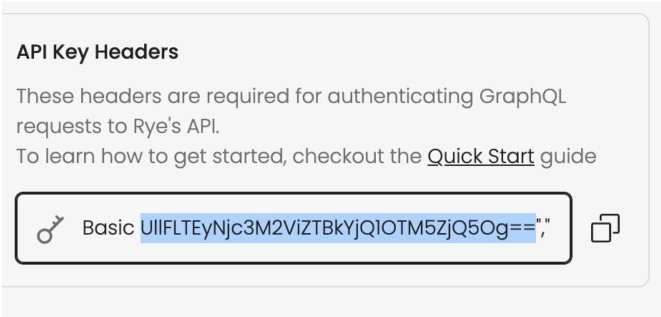
AUTH_HEADERwith the value from console.rye.com/account > Rye API Authentication > API Key HeadersReplace
AUTH_TOKENwith the token value inAUTH_HEADERfrom console.rye.com/account > Rye API Authentication > API Key Headers
Install dependencies
Returning back to your terminal, let’s install dependencies and start our backend and storefront app.
Install the dependencies for both repos by running:
cd rye-medusa-storefront
npm install
cd ../rye-medusa
npm install
Dummy data
Before running the backend we need to fill it with dummy data by running the command below in rye-medusa directory
npm run seed:onboarding
npm run seed
Starting up
Start both repos locally by running the below command in BOTH rye-medusa and rye-medusa-storefront
Start both repos locally by running the below in both the repos:
npm run devEverything will now be running at these three urls:
http://localhost:7001 - Admin page
http://localhost:8000 - Storefront
http://localhost:9000 - Backend api
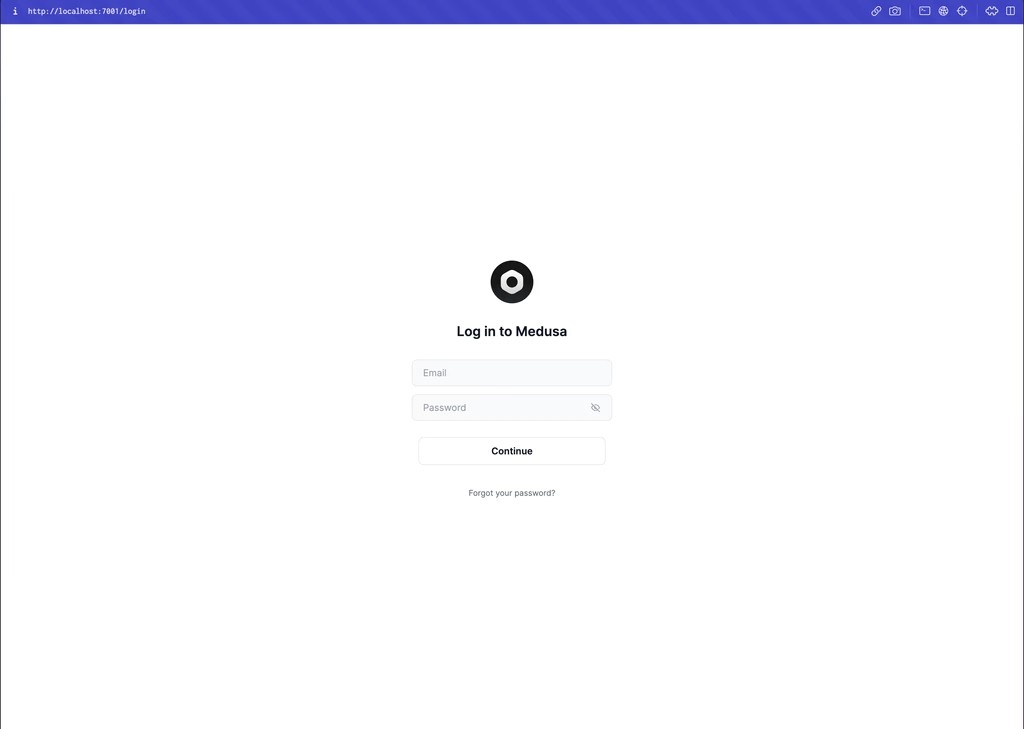
Lets login to the admin page and view the products page at http://localhost:7001
The username and password for the admin page is
username:
admin@medusa-test.compassword:
supersecret
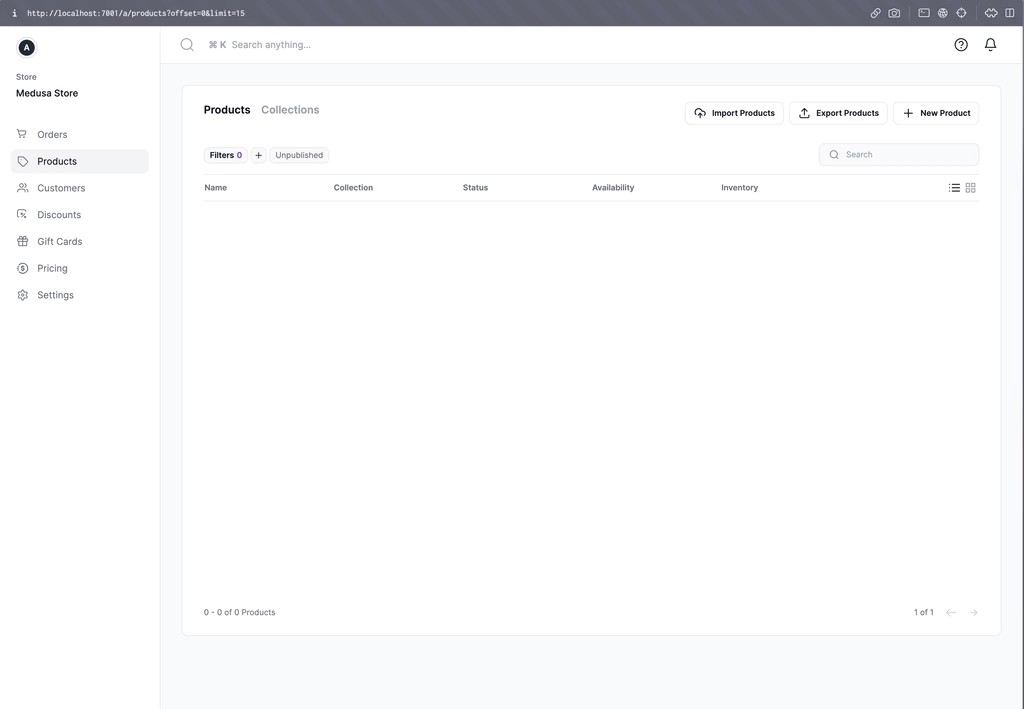
Once you log in navigate to Products page. It is probably empty but we will fill it up in the next section.
We will first run through steps to set up Medusa.
For the tutorial we will clone two repos that contain default settings. Run the following commands from your terminal to download the code.
git clone https://github.com/rye-com/rye-medusa.gitRye Medusa Storefront (NextJS App)
NextJS is a popular frontend framework that Medusa uses to build the frontend.
git clone https://github.com/rye-com/rye-medusa-storefront.gitAfter cloning the repos, we will create environment variable files at the root of both repos.
Environment files
rye-medusa
Create a file called
rye-medusa/.env
DATABASE_TYPE=postgres
# POSTGRES_PASSWORD is the password you set when installing postgresql
DATABASE_URL=postgres://postgres:${POSTGRES_PASSWORD}@localhost/rye-store
MEDUSA_ADMIN_ONBOARDING_TYPE=nextjs
STORE_CORS=http://localhost:8000,http://localhost:7001
MEDUSA_ADMIN_ONBOARDING_NEXTJS_DIRECTORY=rye-medusa-storefront
# Extract this value from console.rye.com/account > Rye API Authentication > API Key Headers
RYE_AUTH_HEADER="Basic ${AUTH_TOKEN}"
Replace
POSTGRES_PASSWORDwith the password from the Postgres installationReplace
AUTH_TOKENwith the value from console.rye.com/account > Rye API Authentication > API Key Headers
rye-medusa-storefront
Create the environment file
rye-medusa-storefront/.env.local
# Your Medusa backend, should be updated to where you are hosting your server. Remember to update CORS settings for your server. See – https://docs.medusajs.com/usage/configurations#storefront-cors
NEXT_PUBLIC_MEDUSA_BACKEND_URL=http://localhost:9000
NEXT_RYE_API_HEADER=http://localhost:9000
NEXT_RYE_AUTH_HEADER="${AUTH_HEADER}"
NEXT_PUBLIC_RYE_AUTH_TOKEN="${AUTH_TOKEN}"

# Your store URL, should be updated to where you are hosting your storefront.
NEXT_PUBLIC_BASE_URL=http://localhost:8000

# Posgres URL for your Medusa DB for the Product Module. See - https://docs.medusajs.com/modules/products/serverless-module
POSTGRES_URL=postgres://postgres:postgres@localhost:5432/medusa

# Your Stripe public key. See – https://docs.medusajs.com/add-plugins/stripe
NEXT_PUBLIC_STRIPE_KEY=

# Your PayPal Client ID. See – https://docs.medusajs.com/add-plugins/paypal
NEXT_PUBLIC_PAYPAL_CLIENT_ID=

# Your MeiliSearch / Algolia keys. See – https://docs.medusajs.com/add-plugins/meilisearch or https://docs.medusajs.com/add-plugins/algolia
NEXT_PUBLIC_SEARCH_APP_ID=
NEXT_PUBLIC_SEARCH_ENDPOINT=http://127.0.0.1:7700
NEXT_PUBLIC_SEARCH_API_KEY=
NEXT_PUBLIC_INDEX_NAME=products

# Your Next.js revalidation secret. See – https://nextjs.org/docs/app/building-your-application/data-fetching/fetching-caching-and-revalidating#on-demand-revalidation
REVALIDATE_SECRET=supersecret
Once again, replace
AUTH_HEADERwith the value from console.rye.com/account > Rye API Authentication > API Key HeadersReplace
AUTH_TOKENwith the token value inAUTH_HEADERfrom console.rye.com/account > Rye API Authentication > API Key Headers
Install dependencies
Returning back to your terminal, let’s install dependencies and start our backend and storefront app.
Install the dependencies for both repos by running:
cd rye-medusa-storefront
npm install
cd ../rye-medusa
npm install
Dummy data
Before running the backend we need to fill it with dummy data by running the command below in rye-medusa directory
npm run seed:onboarding
npm run seed
Starting up
Start both repos locally by running the below command in BOTH rye-medusa and rye-medusa-storefront
Start both repos locally by running the below in both the repos:
npm run devEverything will now be running at these three urls:
http://localhost:7001 - Admin page
http://localhost:8000 - Storefront
http://localhost:9000 - Backend api
Lets login to the admin page and view the products page at http://localhost:7001
The username and password for the admin page is
username:
admin@medusa-test.compassword:
supersecret
Once you log in navigate to Products page. It is probably empty but we will fill it up in the next section.
2. Add products to the store using Rye’s API
Now that we have the store up and running locally, lets add some products!
Understanding the Add product endpoint
The Rye’s Sell Anything API allows you to retrieve product data from Amazon Business or Shopify product by its URL, and list it on your marketplace. Our medusa app comes equipped with a backend endpoint that when called, adds a given product URL to the medusa store. Let’s dissect that endpoint first.
Open up rye-medusa/src/api/admin/rye/products/add-products/route.ts
In order to add products to our store, we first retrieve products from Rye API
// This mutation takes a url from either Amazon or Shopify and
// adds the product to Rye's inventory
for (const { url, marketplace } of productUrls) {
  productRequests.push(
    ryeClient
      .mutation(GET_PRODUCT_BY_URL, {
        input: {
          url,
          marketplace,
        },
      })
      .toPromise()
  );
}

const productIds = (await Promise.all(productRequests)).map((product) => ({
  id: product.data.requestProductByURL.productID,
  marketplace: (product.operation.variables as any).input.marketplace,
}));

const productPromises = [];

// This query grabs a product in Rye's inventory
for (const { id, marketplace } of productIds) {
  productPromises.push(
    ryeClient
      .query(GET_PRODUCT_BY_ID, {
        input: {
          id,
          marketplace,
        },
      })
      .toPromise()
  );
}

const results = await Promise.all(productPromises);
snippet taken from rye-medusa/src/api/admin/rye/clients.ts:L21-L52
Once we have grabbed all the products from Rye API, we add them to our store.
// This adds a Rye product to our medusa store
medusaClient.admin.products.create({
    title: result.data.productByID.title,
    images: result.data.productByID.images.map((i) => i.url),
    description: result.data.productByID.description,
    thumbnail: result.data.productByID.images[0].url,
    status: ProductStatus.PUBLISHED,
    metadata: {
      marketplaceId: result.data.productByID.id,
      marketplace: result.data.productByID.marketplace,
    },
    variants: [
      {
        title: result.data.productByID.title,
        inventory_quantity: 10,
        metadata: {
          marketplaceId: result.data.productByID.id,
          marketplace: result.data.productByID.marketplace,
        },
        prices: [
          {
            currency_code: result.data.productByID.price.currency,
            amount: result.data.productByID.price.value,
          },
        ],
      },
    ],
    is_giftcard: false,
    discountable: false,
  })
snippet taken from rye-medusa/src/api/admin/rye/clients.ts:L60
Calling the Add product endpoint
Now that we understand how the endpoint for adding products was created, lets add products to our store by calling this endpoint!
First we need to grab our access token so that we can make requests to medusa admin endpoints. You can do that by using the curl utility to make HTTP requests.
curl --location 'http://localhost:9000/admin/auth/token' \
--header 'Content-Type: application/json' \
--data-raw '{
    "email":"admin@medusa-test.com",
    "password":"supersecret"
}'
This will return an access token that we will use to call our /add-products endpoint. Copy the access token value.
{"access_token":"${ACCESS_TOKEN}"}response from /admin/auth/token request
Once we have our access token, we can call the /add-products endpoint. Replace the ${ACCESS_TOKEN} with the one we copied above. Run the curl command to add products to the store.
curl --location 'http://localhost:9000/admin/rye/products/add-products' \
--header 'Content-Type: application/json' \
--header 'Authorization: Bearer ${ACCESS_TOKEN}' \
--data '{
    "productUrls": [
        {
            "url": "https://www.amazon.com/All-natural-toothpaste-whitening-fluoride-free/dp/B083JHCCV2?content-id=amzn1.sym.16b389cf-68c1-4ee8-9417-1a50799b2607",
            "marketplace": "AMAZON"
        },
        {
            "url": "https://www.amazon.com/Adjustable-Skating-Protective-Bicycle-Skateboarding/dp/B0CGHWCR5W?crid=1505U177ZCXAP&keywords=bike+knee+and+elbow+pads+for+kids+5-8&qid=1699224850&sprefix=bike+kn,aps,203&sr=8-10",
            "marketplace": "AMAZON"
        },
        {
            "url": "https://www.amazon.com/Ausletie-Skating-Protective-Skateboard-Scooter/dp/B09Y1RXXQ2?crid=1505U177ZCXAP&keywords=bike+knee+and+elbow+pads+for+kids+5-8&qid=1699224906&sprefix=bike+kn,aps,203&sr=8-15",
            "marketplace": "AMAZON"
        },
        {
            "url": "https://www.amazon.com/dp/B0B3PF8GWW",
            "marketplace": "AMAZON"
        }
    ]
}'
Open http://localhost:7001/a/products?offset=0&limit=15 to check the product page. If everything worked, there should be products in the list! 🎉🎉🎉

To view the added products, you can also head to http://localhost:8000/store
Add margins to earn from each sale
You can make a profit on the products you add by adding a margin. First set the margin in https://console.rye.com/account

Then you can call the add-product endpoint passing margin in the body. This will make sure the price in your store reflects the margin price you will charge customers who buy products you add with Rye.
curl --location 'http://localhost:9000/admin/rye/products/add-products' \
--header 'Content-Type: application/json' \
--header 'Authorization: Bearer ${ACCESS_TOKEN}' \
--data '{
		"margin": {"unit": "percent", value: 10},
    "productUrls": [
        {
            "url": "https://www.amazon.com/All-natural-toothpaste-whitening-fluoride-free/dp/B083JHCCV2?content-id=amzn1.sym.16b389cf-68c1-4ee8-9417-1a50799b2607",
            "marketplace": "AMAZON"
        },
        {
            "url": "https://www.amazon.com/Adjustable-Skating-Protective-Bicycle-Skateboarding/dp/B0CGHWCR5W?crid=1505U177ZCXAP&keywords=bike+knee+and+elbow+pads+for+kids+5-8&qid=1699224850&sprefix=bike+kn,aps,203&sr=8-10",
            "marketplace": "AMAZON"
        },
        {
            "url": "https://www.amazon.com/Ausletie-Skating-Protective-Skateboard-Scooter/dp/B09Y1RXXQ2?crid=1505U177ZCXAP&keywords=bike+knee+and+elbow+pads+for+kids+5-8&qid=1699224906&sprefix=bike+kn,aps,203&sr=8-15",
            "marketplace": "AMAZON"
        },
        {
            "url": "https://www.amazon.com/dp/B0B3PF8GWW",
            "marketplace": "AMAZON"
        }
    ]
}'
Now that we understand how the endpoint for adding products was created, lets add products to our store by calling this endpoint!
First we need to grab our access token so that we can make requests to medusa admin endpoints. You can do that by using the curl utility to make HTTP requests.
curl --location 'http://localhost:9000/admin/auth/token' \
--header 'Content-Type: application/json' \
--data-raw '{
    "email":"admin@medusa-test.com",
    "password":"supersecret"
}'
This will return an access token that we will use to call our /add-products endpoint. Copy the access token value.
{"access_token":"${ACCESS_TOKEN}"}response from /admin/auth/token request
Once we have our access token, we can call the /add-products endpoint. Replace the ${ACCESS_TOKEN} with the one we copied above. Run the curl command to add products to the store.
curl --location 'http://localhost:9000/admin/rye/products/add-products' \
--header 'Content-Type: application/json' \
--header 'Authorization: Bearer ${ACCESS_TOKEN}' \
--data '{
    "productUrls": [
        {
            "url": "https://www.amazon.com/All-natural-toothpaste-whitening-fluoride-free/dp/B083JHCCV2?content-id=amzn1.sym.16b389cf-68c1-4ee8-9417-1a50799b2607",
            "marketplace": "AMAZON"
        },
        {
            "url": "https://www.amazon.com/Adjustable-Skating-Protective-Bicycle-Skateboarding/dp/B0CGHWCR5W?crid=1505U177ZCXAP&keywords=bike+knee+and+elbow+pads+for+kids+5-8&qid=1699224850&sprefix=bike+kn,aps,203&sr=8-10",
            "marketplace": "AMAZON"
        },
        {
            "url": "https://www.amazon.com/Ausletie-Skating-Protective-Skateboard-Scooter/dp/B09Y1RXXQ2?crid=1505U177ZCXAP&keywords=bike+knee+and+elbow+pads+for+kids+5-8&qid=1699224906&sprefix=bike+kn,aps,203&sr=8-15",
            "marketplace": "AMAZON"
        },
        {
            "url": "https://www.amazon.com/dp/B0B3PF8GWW",
            "marketplace": "AMAZON"
        }
    ]
}'
Open http://localhost:7001/a/products?offset=0&limit=15 to check the product page. If everything worked, there should be products in the list! 🎉🎉🎉
To view the added products, you can also head to http://localhost:8000/store
Add margins to earn from each sale
You can make a profit on the products you add by adding a margin. First set the margin in https://console.rye.com/account
Then you can call the add-product endpoint passing margin in the body. This will make sure the price in your store reflects the margin price you will charge customers who buy products you add with Rye.
curl --location 'http://localhost:9000/admin/rye/products/add-products' \
--header 'Content-Type: application/json' \
--header 'Authorization: Bearer ${ACCESS_TOKEN}' \
--data '{
		"margin": {"unit": "percent", value: 10},
    "productUrls": [
        {
            "url": "https://www.amazon.com/All-natural-toothpaste-whitening-fluoride-free/dp/B083JHCCV2?content-id=amzn1.sym.16b389cf-68c1-4ee8-9417-1a50799b2607",
            "marketplace": "AMAZON"
        },
        {
            "url": "https://www.amazon.com/Adjustable-Skating-Protective-Bicycle-Skateboarding/dp/B0CGHWCR5W?crid=1505U177ZCXAP&keywords=bike+knee+and+elbow+pads+for+kids+5-8&qid=1699224850&sprefix=bike+kn,aps,203&sr=8-10",
            "marketplace": "AMAZON"
        },
        {
            "url": "https://www.amazon.com/Ausletie-Skating-Protective-Skateboard-Scooter/dp/B09Y1RXXQ2?crid=1505U177ZCXAP&keywords=bike+knee+and+elbow+pads+for+kids+5-8&qid=1699224906&sprefix=bike+kn,aps,203&sr=8-15",
            "marketplace": "AMAZON"
        },
        {
            "url": "https://www.amazon.com/dp/B0B3PF8GWW",
            "marketplace": "AMAZON"
        }
    ]
}'
3. Storefront and payment
Now that we have products, let’s integrate Rye in our storefront to process payments and handle order placement.
Navigate to http://localhost:8000.

Medusa can handle cart creation and checkout flows. To check out and submit the cart, we have to set up a payment method. Medusa supports Stripe or PayPal. Instead of fumbling with additional APIs, we can stick with Rye’s API to process payment.
Now lets look at how this store uses Rye API to integrate:
Payment inputs
Order placement
Understanding the RyePay Integration
First, we have to create the payment inputs using our RyePaypackage. RyePay handles payment processing by vaulting user credit card details for further transactions.
The code below is part of the RyePayProvider provider to manage RyePay.
The provider will return some values that will be used in later components. Specifically, we will need initRyePayElements and submit.
 /**
 * Initializes RyePay elements
 */
const initRyePayElements = useCallback(() => {
  ryePay.init({
    apiKey: window
      .atob(process.env.NEXT_PUBLIC_RYE_PAY_TOKEN ?? "")
      .replaceAll(":", ""),
    numberEl: "spreedly-number",
    cvvEl: "spreedly-cvv",
    environment: "prod",
    onReady: () => {
      ryePay.setStyle(
        "number",
        "font-size: 14px;display:block;width:100%;border-radius:1px;border:1px solid #ccc;background-color:#fff;padding:14px;box-sizing:border-box;"
      )
      ryePay.setStyle(
        "cvv",
        "font-size: 14px;display:block;width:100%;border-radius:1px;border:1px solid #ccc;background-color:#fff;padding:14px;box-sizing:border-box;"
      )
      ryePay.setPlaceholder("number", "Card number")
      ryePay.setPlaceholder("cvv", "CVV")
    },
    onCartSubmitted: (submitCartResults, errors) => {
      if (
        (errors && errors.length > 0) ||
        (submitCartResults?.errors && submitCartResults.errors.length > 0)
      ) {
        console.log(errors)
      } else {
        setPaymentCompleted(true)
      }
      setIsSubmitting(false)
    },
    onErrors: (errors: any[]) => {
      for (const { key, message, attribute } of errors) {
        console.log(`new error: ${key}-${message}-${attribute}`)
      }
      setIsSubmitting(false)
    },
    enableLogging: true,
    onIFrameError: (err: unknown) => {
      console.log(`frameError: ${JSON.stringify(err)}`)
    },
  })
}, [])
snippet taken from /rye-medusa-storefront/src/lib/context/ryepay-context.tsx
The initRyePayElements function loads the RyePay package and injects payment inputs into the component. This step would be familiar if you have worked with the Stripe SDK, Spreedly, or Very Good Security.
const { month, year, setMonth, setYear, initRyePayElements } = useRyePay()

  useEffect(() => {
    initRyePayElements?.()
  }, [initRyePayElements])
snippet taken from rye-medusa-storefront/src/modules/checkout/components/payment-rye.tsx
Now that we have products, let’s integrate Rye in our storefront to process payments and handle order placement.
Navigate to http://localhost:8000.
Medusa can handle cart creation and checkout flows. To check out and submit the cart, we have to set up a payment method. Medusa supports Stripe or PayPal. Instead of fumbling with additional APIs, we can stick with Rye’s API to process payment.
Now lets look at how this store uses Rye API to integrate:
Payment inputs
Order placement
Understanding the RyePay Integration
First, we have to create the payment inputs using our RyePaypackage. RyePay handles payment processing by vaulting user credit card details for further transactions.
The code below is part of the RyePayProvider provider to manage RyePay.
The provider will return some values that will be used in later components. Specifically, we will need initRyePayElements and submit.
 /**
 * Initializes RyePay elements
 */
const initRyePayElements = useCallback(() => {
  ryePay.init({
    apiKey: window
      .atob(process.env.NEXT_PUBLIC_RYE_PAY_TOKEN ?? "")
      .replaceAll(":", ""),
    numberEl: "spreedly-number",
    cvvEl: "spreedly-cvv",
    environment: "prod",
    onReady: () => {
      ryePay.setStyle(
        "number",
        "font-size: 14px;display:block;width:100%;border-radius:1px;border:1px solid #ccc;background-color:#fff;padding:14px;box-sizing:border-box;"
      )
      ryePay.setStyle(
        "cvv",
        "font-size: 14px;display:block;width:100%;border-radius:1px;border:1px solid #ccc;background-color:#fff;padding:14px;box-sizing:border-box;"
      )
      ryePay.setPlaceholder("number", "Card number")
      ryePay.setPlaceholder("cvv", "CVV")
    },
    onCartSubmitted: (submitCartResults, errors) => {
      if (
        (errors && errors.length > 0) ||
        (submitCartResults?.errors && submitCartResults.errors.length > 0)
      ) {
        console.log(errors)
      } else {
        setPaymentCompleted(true)
      }
      setIsSubmitting(false)
    },
    onErrors: (errors: any[]) => {
      for (const { key, message, attribute } of errors) {
        console.log(`new error: ${key}-${message}-${attribute}`)
      }
      setIsSubmitting(false)
    },
    enableLogging: true,
    onIFrameError: (err: unknown) => {
      console.log(`frameError: ${JSON.stringify(err)}`)
    },
  })
}, [])
snippet taken from /rye-medusa-storefront/src/lib/context/ryepay-context.tsx
The initRyePayElements function loads the RyePay package and injects payment inputs into the component. This step would be familiar if you have worked with the Stripe SDK, Spreedly, or Very Good Security.
const { month, year, setMonth, setYear, initRyePayElements } = useRyePay()

  useEffect(() => {
    initRyePayElements?.()
  }, [initRyePayElements])
snippet taken from rye-medusa-storefront/src/modules/checkout/components/payment-rye.tsx
4. Place an Order!
To create a cart in Rye, we need to input the cart data from MedusaJS.
Our storefront code is just a NextJS app so we leveraged NextJS server side to create an endpoint for creating a cart. We have an endpoint, /api/rye/carts/create, that can be used to create a cart. You can check out the implementation at rye-medusa-storefront/src/app/api/rye/carts/route.ts
To call the endpoint above, we created a utility function for creating a cart in rye-medusa-storefront/src/lib/data/index/ts
export const createRyeCart = async (body: unknown) => {
  const cart = await fetch(`${API_BASE_URL}/api/rye/carts/create`, {
    method: "POST",
    body: JSON.stringify(body),
  }).then((res) => res.json())

  return cart
}
function in /rye-medusa-storefront/src/lib/data/index.ts
We use this function in the RyePayProvider's createCart function to create or update our Rye cart. Then the submit function places an order via RyePay.
/**
* Creates a cart using Rye's api
*/
const createCart = useCallback(async () => {

...

  if (ryeCart) {
    updatedRyeCart = await updateRyeCartBuyerIdentity({
      buyerIdentity,
      cartId: ryeCart.id,
    })
  } else {
    updatedRyeCart = await createRyeCart({
      items: ryeCartItems,
      buyerIdentity,
    })
  }

...

}, [cart, getValues, ryeCart])


/**
* Places the order using Rye's api
*/
const submit = useCallback(async () => {

  ryePay.submit({
    first_name: cart.shipping_address?.first_name ?? "",
    last_name: cart.shipping_address?.last_name ?? "",
    month,
    year,
    phone_number: cart.billing_address?.phone ?? "",
    cartId: ryeCart.id, // IMPORTANT! Make sure the cartId is valid
    address1: cart.shipping_address?.address_1 ?? "",
    address2: cart.shipping_address?.address_2 ?? "",
    zip: cart.shipping_address?.postal_code ?? "",
    city: cart.shipping_address?.city ?? "",
    country: cart.shipping_address?.country_code?.toUpperCase() ?? "",
    state: cart.shipping_address?.province ?? "",
    selectedShippingOptions: ryeCart.stores.map((store) => {
      return {
        shippingId: store.offer?.shippingMethods[0].id ?? "",
        store: store.store,
      }
    }),
    shopperIp: response.ip,
  })

  localStorage.removeItem("ryeCartId")
}, [cart, month, ryeCart, year])
snippet taken from /rye-medusa-storefront/src/lib/context/ryepay-context.tsx
We call the useRyePay hook to get the functions and call them when our checkout button is clicked.
const { submit, isPaymentCompleted, isSubmitting } = useRyePay()
...
return (
    <Button disabled={submitting || notReady} onClick={submit}>
      {submitting ? <Spinner /> : "Checkout"}
    </Button>
  )
snippet taken from /rye-medusa-storefront/src/modules/checkout/components/payment-button/index.tsx
Placing a real order
With everything assembled, we can now place real orders on our store. Let’s try it out!
Head to Hydrating mist product page
Add the item to cart
Fill in the information and checkout
Once you checkout, you should see the following on the Medusa admin dashboard.
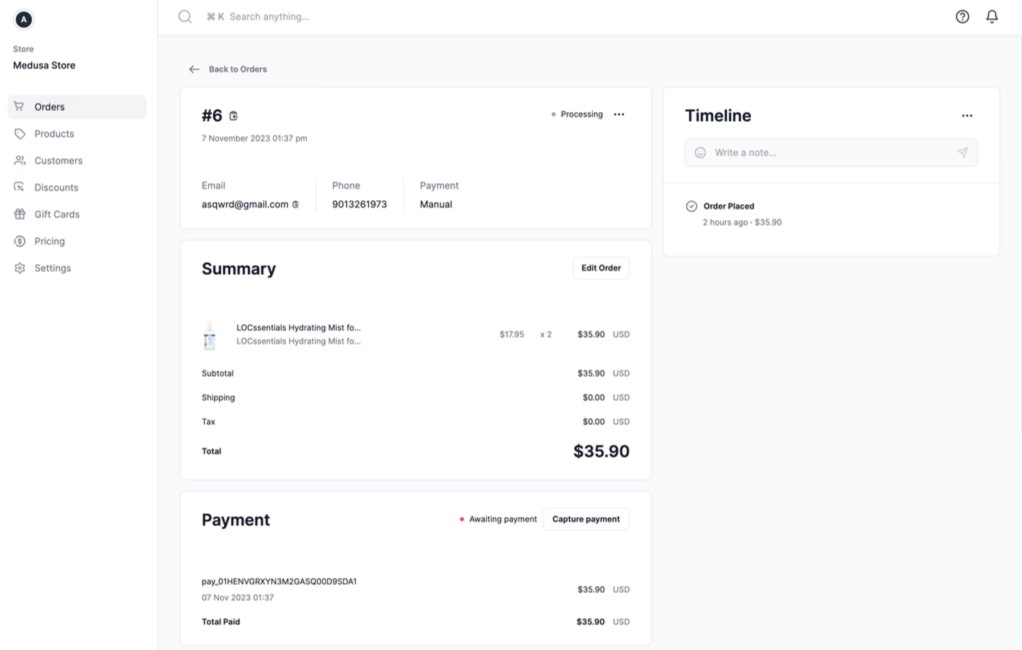
Medusa Admin
Your orders are also visible on the Rye Console.
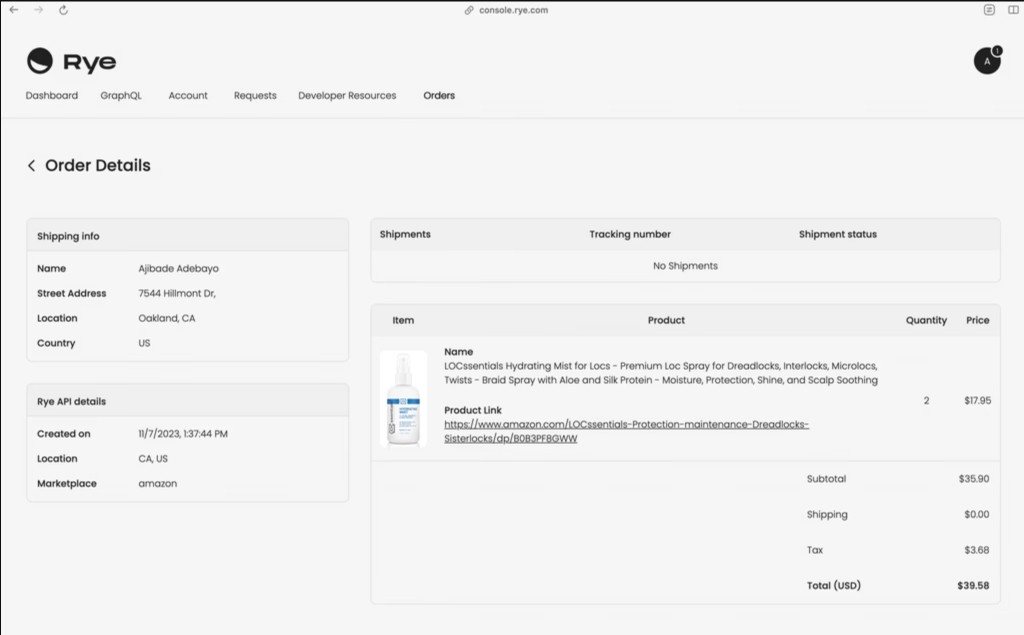
RyeConsole
Hooray! We placed a real order!
This is a tutorial for a legacy Rye product, Sell Anything API. Want to integrate one-click checkout from any merchant – yes, any merchant? You’ll want Rye’s Universal Checkout API for that.
To create a cart in Rye, we need to input the cart data from MedusaJS.
Our storefront code is just a NextJS app so we leveraged NextJS server side to create an endpoint for creating a cart. We have an endpoint, /api/rye/carts/create, that can be used to create a cart. You can check out the implementation at rye-medusa-storefront/src/app/api/rye/carts/route.ts
To call the endpoint above, we created a utility function for creating a cart in rye-medusa-storefront/src/lib/data/index/ts
export const createRyeCart = async (body: unknown) => {
  const cart = await fetch(`${API_BASE_URL}/api/rye/carts/create`, {
    method: "POST",
    body: JSON.stringify(body),
  }).then((res) => res.json())

  return cart
}
function in /rye-medusa-storefront/src/lib/data/index.ts
We use this function in the RyePayProvider's createCart function to create or update our Rye cart. Then the submit function places an order via RyePay.
/**
* Creates a cart using Rye's api
*/
const createCart = useCallback(async () => {

...

  if (ryeCart) {
    updatedRyeCart = await updateRyeCartBuyerIdentity({
      buyerIdentity,
      cartId: ryeCart.id,
    })
  } else {
    updatedRyeCart = await createRyeCart({
      items: ryeCartItems,
      buyerIdentity,
    })
  }

...

}, [cart, getValues, ryeCart])


/**
* Places the order using Rye's api
*/
const submit = useCallback(async () => {

  ryePay.submit({
    first_name: cart.shipping_address?.first_name ?? "",
    last_name: cart.shipping_address?.last_name ?? "",
    month,
    year,
    phone_number: cart.billing_address?.phone ?? "",
    cartId: ryeCart.id, // IMPORTANT! Make sure the cartId is valid
    address1: cart.shipping_address?.address_1 ?? "",
    address2: cart.shipping_address?.address_2 ?? "",
    zip: cart.shipping_address?.postal_code ?? "",
    city: cart.shipping_address?.city ?? "",
    country: cart.shipping_address?.country_code?.toUpperCase() ?? "",
    state: cart.shipping_address?.province ?? "",
    selectedShippingOptions: ryeCart.stores.map((store) => {
      return {
        shippingId: store.offer?.shippingMethods[0].id ?? "",
        store: store.store,
      }
    }),
    shopperIp: response.ip,
  })

  localStorage.removeItem("ryeCartId")
}, [cart, month, ryeCart, year])
snippet taken from /rye-medusa-storefront/src/lib/context/ryepay-context.tsx
We call the useRyePay hook to get the functions and call them when our checkout button is clicked.
const { submit, isPaymentCompleted, isSubmitting } = useRyePay()
...
return (
    <Button disabled={submitting || notReady} onClick={submit}>
      {submitting ? <Spinner /> : "Checkout"}
    </Button>
  )
snippet taken from /rye-medusa-storefront/src/modules/checkout/components/payment-button/index.tsx
Placing a real order
With everything assembled, we can now place real orders on our store. Let’s try it out!
Head to Hydrating mist product page
Add the item to cart
Fill in the information and checkout
Once you checkout, you should see the following on the Medusa admin dashboard.
Medusa Admin
Your orders are also visible on the Rye Console.
RyeConsole
Hooray! We placed a real order!
This is a tutorial for a legacy Rye product, Sell Anything API. Want to integrate one-click checkout from any merchant – yes, any merchant? You’ll want Rye’s Universal Checkout API for that.